

Exterior, interior, deployable and keyless-entry faults
Range Rover Door Handle Repair Dubai
A door handle can fail mechanically, electrically or at the latch connection. A handle that feels loose, stays deployed, does not unlock with touch, opens from one side only or works intermittently needs the complete operating chain checked before a painted handle or door module is replaced.
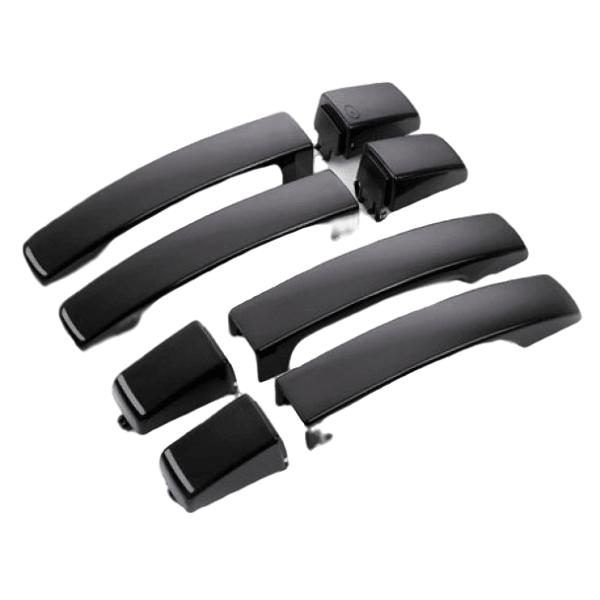
Different handle designs fail differently
Identify which handle system is fitted before ordering parts
Range Rover models and generations use conventional exterior handles, deployable flush handles, interior pull handles and keyless-entry sensors with different mounting, wiring and finish requirements.
Conventional exterior handle
Common concerns include looseness, broken pivots, detached linkages, cracked housings, lock-cylinder trim and keyless sensor faults.
- Check the handle base and door skin
- Check cable or rod connection
- Check the latch before blaming the handle
- Match painted or textured finish
Deployable flush handle
The handle must present, retract and transfer the pull request. Motor, gears, pivots, obstruction, wiring, control and ice or contamination history can matter.
- Compare all doors
- Check presentation and retraction
- Listen for motor operation
- Inspect for binding or impact damage
Interior handle and latch release
A loose or ineffective inside handle can involve the trim handle, pivot, cable, latch or previous door-panel work.
- Check handle travel and resistance
- Check child-lock or lock status
- Inspect cable end and routing
- Protect trim during access
Use the exact behaviour
One door-handle symptom can point to several components
The fastest diagnosis compares outside, inside, remote and keyless operation on the same door and against the other doors.
Handle pivot, base, cable, rod, clip, mounting point or previous repair.
Compare travel with another door and check whether the latch releases from inside.
Detached linkage, stretched cable, broken lever, locked latch or latch fault.
Check lock status, inside release and actual latch movement.
Handle sensor, wiring, antenna, door module, vehicle settings or key recognition.
Check remote unlock, other doors, key battery symptoms and stored faults.
Obstruction, mechanism, motor, gear, wiring, control or impact damage.
Listen for operation, compare doors and stop forcing the handle.
Interior handle, cable, trim mounting, child lock or latch release path.
Check handle resistance and the affected door’s lock settings.
Wear, loose connection, moisture, alignment, latch position or control issue.
Record temperature, locking state and whether the door has dropped or shifted.
Mechanical and electrical diagnosis in one sequence
How the failed link in the door-opening chain is found
The door is opened by a connected system, not by the visible handle alone. The inspection compares every input, the electrical response, the handle movement, the linkage and the latch so the first failed link is identified before parts are approved.

Confirm every way the door should open
Outside handle, inside handle, remote unlock, keyless touch, manual key access and current lock status are compared before trim is removed.
Check handle travel, mounting and door alignment
Loose mounting, excessive travel, paint interference, impact damage, door drop, seal pressure and latch alignment can change the handle feel.
Compare electrical commands with physical response
Where fitted, door-module faults, sensor inputs, lock status, supply and communication are checked against what the handle, actuator and latch physically do.
Open the door trim only when the test route requires it
The door card, clips, vapour barrier, wiring and fitted safety equipment are protected while the cable, rod, carrier and latch movement are observed.
Separate the painted cover from the failed mechanism
The quotation identifies whether the fault is the visible cover, handle carrier, sensor, cable, rod, actuator, latch or a related mounting part.
Reassemble and prove secure operation
Outside and inside release, remote unlock, keyless entry, central locking, child lock, deployable presentation and door-warning status are checked after repair.
Remote works but touch entry fails
First route: handle sensor, local wiring, antenna coverage, door-module input and key recognition.
Handle moves but the door stays closed
First route: cable, rod, clip, carrier, latch lever, lock state and door alignment.
Deployable handle stays in or out
First route: obstruction, drive mechanism, motor response, wiring, control and impact damage.
Choose the smallest complete repair
Repair, component replacement or complete handle assembly
A limited repair may be suitable when
- A clip, cable end or accessible linkage is the confirmed fault
- The handle housing and mounting points remain sound
- A sensor or switch is available separately and tests support failure
- The painted cover can be reused without damage
- The latch operates correctly after the linkage is restored
The scope should still include trim clips, vapour-barrier sealing and a complete function check.
A larger assembly may be required when
- The pivot, housing or loaded mounting area is broken
- A deployable mechanism has damaged gears or guides
- Water or impact has affected several internal parts
- The part is supplied only as an assembly for the exact vehicle
- Previous repair has left unstable or missing material
Part identification should use the VIN, door position, finish, keyless equipment and model generation.
Fit and finish matter on visible handle parts
Painted covers, seals and door surfaces need careful handling
Some repairs reuse the original painted handle cover. Others require a new cover or complete assembly that must match the vehicle finish. The work should avoid chipped edges, trapped seals, scratches around the handle pocket and overspray on sensors or textured parts.
A handle that sits too deep, too high or under tension can feel wrong and may bind. The door should be checked for previous body repair, distortion and latch alignment before the handle is blamed for every fit issue.
Protect the complete door while repairing the handle
Door trim, wiring, seals and latch adjustment are part of a correct repair
Accessing a handle can require more than removing the visible cover. The door card, vapour barrier, cable routing, wiring connectors, glass position and latch area may all be close to the work. A careful plan prevents a handle repair from creating a rattle, water leak or window concern.
Interior trim and clips
Fasteners and hidden clips should be released in the correct order. Broken clips can allow the door card to move or rattle. The estimate should state whether damaged trim hardware is included rather than refitting loose parts.
Vapour barrier and water management
The membrane behind the door trim helps direct water toward the designed drain path. It should be resealed after access. A poorly sealed membrane can cause damp carpet or speaker-area moisture that appears unrelated to the handle.
Cables, rods and latch position
A new handle cannot compensate for a stretched cable, bent rod, stiff latch or door that sits low on its hinges. Opening effort and latch release should be checked with the door open and closed before the handle is condemned.
Model and generation differences
Deployable handles, conventional pull handles and keyless-entry handles use different brackets, electronics, covers and calibration needs. Full-size Range Rover, Sport, Evoque and Velar applications should be identified from the VIN and fitted equipment. A similar-looking painted cover may not fit the internal assembly.
Common handle misdiagnoses
A keyless complaint may come from the key, vehicle battery condition, antenna coverage, door wiring or latch status rather than the handle sensor. A handle that feels loose may be a mounting or carrier fault rather than a complete latch failure. Mechanical and electrical evidence should be separated before ordering parts. The workshop should also confirm whether every door is affected, whether the interior release still works, whether the vehicle recognises the door as closed and whether the concern changes with another key. Those details help separate a local handle problem from a central locking, battery or communication concern before trim is removed. It also helps define whether safe recovery access is required.
Stop forcing a deployable or stuck handle
Repeated pulling can damage the cover, pivot, carrier or painted door surface. Send a video of the movement and note whether the fault changes after locking, unlocking or using another key.
The handle is only one part of the opening system
What changes the Range Rover door-handle repair quotation
The scope depends on the handle type, door position, keyless-entry equipment, painted cover, deployable mechanism, cable or rod, latch, wiring, module findings, trim removal and any body damage. A loose exterior handle, failed touch sensor, broken interior pull and jammed deployable handle require different parts and access.
A useful quotation should separate diagnosis, handle or mechanism parts, latch or linkage work, painted components, trim clips and final security checks. Prices and completion times should be confirmed after the exact vehicle and failed layer are known.
Do not slam or force a door that will not latch
A damaged latch, misaligned door, loose handle or trapped linkage can worsen with repeated force. If the door cannot secure safely, arrange inspection before normal driving.
Range Rover door-handle questions
Answers before booking
Why does the handle move but the door not open?
The handle may not be transferring movement to the latch because of a detached cable, rod, clip, lever or latch fault. Lock status and inside operation help narrow the failed path.
Why does keyless entry fail on only one door?
The affected handle sensor, wiring, antenna or door module may be involved. Compare the remote, other doors and key recognition before replacing the handle.
Can a deployable handle be repaired?
It depends on the failed component, availability and condition of the housing, motor, gears, guides and wiring. Some faults can be repaired separately while others require an assembly.
Does a loose handle always need replacement?
No. Loose movement can come from mounting, linkage or a clip, but a broken pivot, housing or loaded tab may require replacement. The handle must be inspected from both sides.
Can door alignment affect the handle?
Yes. A dropped or misaligned door can load the latch and make the handle feel stiff or inconsistent. Body and latch position should be checked when the door has been hit or closes poorly.
Will the new handle need painting?
Some parts reuse a painted cover, some are supplied in finish and others require painting. The exact part and vehicle specification determine the finish work.
What should I send before booking?
Send the VIN, affected door, a video of the handle, whether inside and outside release work, remote and keyless behaviour, and any recent door, body or battery work.
Book Range Rover door-handle diagnosis in Dubai
Find whether the fault is the handle, linkage, latch or keyless control
Send the VIN, affected door, a short operation video and the results from inside, outside, remote and keyless entry. The workshop can then select the correct mechanical and electrical checks.